
Where do I find my theme?
After you've successfully downloaded the theme from the HubSpot Marketplace, in HubSpot's navigation go to Marketing > Files and Templates > Design Tools and you should be able to find it under the @marketplace folder on the left-hand sidebar.
How do I configure my theme settings?
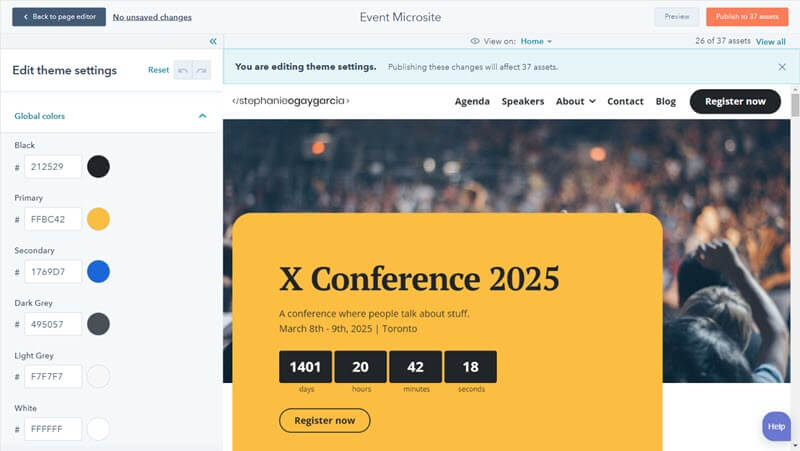
One of the first things you'll want to do is configure your theme settings. When you first download the theme the colours, in particular, may look a little strange as they are pulled in from your branding settings.
You can configure your theme settings in two ways:
- By going to Settings (the gears icon in HubSpot's navigation) > Website > Themes and selecting the Conference Theme.
- From any page editor by clicking into the Design tab on the left of the page > Edit Theme Settings
Under your settings, you'll have options to customize your theme's colours, fonts, spacing, text, buttons, forms, tables, corners and styling for your header and footer.
Read more on HubSpot's "Edit your theme settings" knowledgebase article.
How do I configure my theme colours?
The theme uses six colour fields that, when changed, will update your website globally: Black, Primary, Secondary, Dark Grey, Light Grey and White.
These colours are automatically pulled from your branding settings (read HubSpot's "Customize branding for your HubSpot content" knowledgebase article here).
From your branding settings:
- "Black" uses the "Primary" colour in your branding settings, this is mainly used for your typography. It does not necessarily need to be black.
- "Primary" uses the first colour in your branding settings, this is the main colour, the yellow on the demo site
- "Secondary" uses the second colour in your branding settings, this is a secondary accent colour, the blue on the demo site
- "Dark Grey" uses the third colour in your branding settings, it's used for minor highlights like the day of the week on the agenda items on the demo site. It does not necessarily need to be dark grey.
- "Light Grey" uses the fourth colour in your branding settings, it's used for backgrounds like the light grey behind cards and sections on the demo site. It does not necessarily need to be light grey.
- "White" uses the fifth colour in your branding settings, it's the website's background colour on the demo site. It does not necessarily need to be white.
You can update these colours either from your branding settings or override them here in the theme settings.
Why is the Blog Posts module not displaying any posts?
When you first add the Blog Posts module to a page, it may appear blank until you select a blog from which to display posts from the module settings in the sidebar.
If you've clicked away from the sidebar and can't see the module, you can get back to the settings in one of the two following ways:
- Refresh the page and you should see a "Select Blog" button in the editor screen
- Click into the "Contents" tag on the sidebar (see screenshot below) and you'll see a list of the modules on the page, from there you can click into the "Blog Posts" module

How do I create a button or call-to-action?
There are two ways to create a button in the theme:
1. Use a button module
From the sidebar on the page editor, select the "Button" module and drag it into the page.
In the "Content" tab, add the button's link and text. In the "Styles" tab, under "Style Type" you will be able to choose one of two options:
- Theme Buttons. If this is chosen, you'll be able to choose the style of the button (solid, outline, arrow or text) from the theme options as well as one of your theme colours. You can also choose the alignment.
- Custom. If you choose this, you'll have full editing control over the background, border, corner and spacing on your button.
2. Create a CTA (Call-to-Action) button
You can create a CTA button by following the instructions on HubSpot's "Create calls-to-action (CTA)" knowledgebase article.
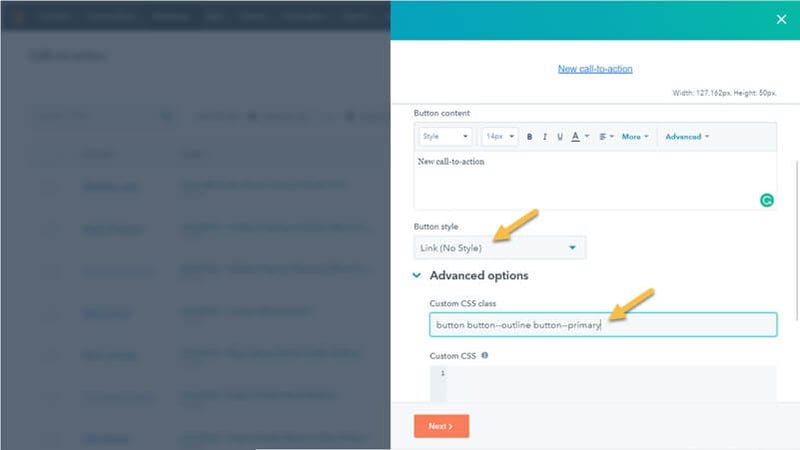
When creating the CTA, HubSpot shows two options in the article: "Design a custom button" and "Design an image button", but there is a third option where you can automatically pull in the styling from the theme using CSS classes.
To do so:
- In the custom button editor, set the "Button Style" to "Text (No Link)"
- Under "Advanced Options", you'll add in three CSS classes separated by a space:
button- this simply establishes your CTA as a button- Add the class corresponding to the button style you'd like to use: Solid (
button--solid), Outline (button--outline), Text (button--text), Arrow (button--arrow) - Add the class corresponding to the button color you'd like to use: Black (
button--black), Primary (button--primary), Secondary (button--secondary), Dark Grey (button--dark-grey), Light Grey (button--light-grey), White (button--white)
It should look something like this:
Button Options
Below are examples of a Solid, Outline, Text and Arrow button, respectively:
What is Schema / Structured Data?
Schema, or structured data, is a standardized format for providing information about a page and classifying the page content. For example, providing information about your event name, location, date and time... etc.
When a search engine like Google picks up this structured data, it may use that information to display your event and you'll have a chance of appearing as featured content. The theme's Accordion (FAQ) module that appears on the demo About page, for example, may display like this on Google:
.png?width=800&name=accordion-faq-rich-snippet%20(1).png)
Note that having structured data on your page does not guarantee that you will appear in a rich result snippet.
What Schema / Structured Data is built into the theme?
There are several areas where you will find structured data:
- Built into certain modules:
- Accordion (FAQ) module. When enabled, it uses the FAQPage schema and adds content from the following fields:
- "Question" field - name
- "Answer" field - acceptedAnswer
- All event modules. These include the Agenda, the Large Agenda Item Card, the Small Agenda Item Card and the Hero Banner - Agenda Item module (used in the Hero Banner - Agenda Item section). When enabled, these use the Event schema and add content from the following fields:
- "Title" field - name
- "Summary" field - description
- "Location" field - location
- "Start Date and Time" field - startDate
- "End Date and Time" field - endDate
- "Speakers" group - performer
- "Full Name" field - name
- Accordion (FAQ) module. When enabled, it uses the FAQPage schema and adds content from the following fields:
- On your blog posts page. This uses the Article schema and adds content from the following:
- Title - headline
- Author - author
- Name - name
- Author Page - url
- Publish Date - datePublished
- Modified Date (hidden) - dateModified
- Image - image
- In certain schema modules. The Event Schema / Structured Content module uses all the recommended fields for the Event schema:
- Title - name
- Description - description
- Start Date and Time - startDate
- End Date and Time - endDate
- Organizer - organizer
- Name - name
- URL - url
- Attendance Mode - eventAttendanceMode
- URL - url
- Image - image
- Location - location
- Name - name
- Address - address
- Street Address - streetAddress
- Locality - addressLocality
- Region - addressRegion
- Postal Code - postalCode
- Country - addressCountry
- URL - url
- Status - eventStatus
- Previous Start Date - previousStartDate
- Performer - performer
- Name - name
- Offers - offers
- Name - name
- URL - url
- Currency - priceCurrency
- Price - price
- Low Price- lowPrice
- Hight Price - highPrice
- Availability - availability
- Valid From Start Date and Time - validFrom
How do I enable Schema / Structured Data on my modules?
When using one of the modules that contain schema (see the list above), you can enable or disable schema by clicking into the "Schema/Structured Data" group and checking or unchecking the "Enable" group.
You may want to disable if, for example, you'd like to use the module for something else, as search engines may penalize you for not using the right type of schema.
Why am I receiving warnings from the Google Search Console?
Each schema type has many possible properties that you can use. However, only a certain number of them are required for your content to qualify as a rich result. In most cases, I have only used the required fields.
Note that warnings are not the same as errors.
In the case of events, you can use the Event Schema / Structured Content module to add more details to the page.
How do I use the Event Schema / Structured Content module?
This module adds code to the HTML that will be picked up by search engines.
To use the module, add it anywhere to the page (no content will be displayed), and add as much information as possible.
Google requires that you populate the following properties:
- Location
- Location Address (if the event is in a physical location)
- Location URL (if the event is online)
- Name
- Start Date
And recommends that you populate the following properties:
- Description
- End Date
- Event Attendance Mode
- Event Status
- Image
- Location Name
- Offers
- Availability
- Price
- Currency
- Valid From
- URL
- Organizer
- Name
- URL
- Performer
- Name
- Previous Start Date (if rescheduled)
How can I test my page for Google Rich Results?
You can enter the URL into the Google Rich Results checker.